|
|
|
4wkdlmxiihs6403401114.gif

+ D0 k" a# W G, c% i# O( n点击上方蓝色字体,关注我们
* M' V: L0 e5 n4 XProtobuf(Protocol Buffers)是由 Google 开发的一种轻量级、高效的结构化数据序列化方式,用于在不同应用之间进行数据交换和存储。它可以用于多种编程语言,并支持自动生成代码,使得数据结构定义和序列化/反序列化过程更加简洁和高效。# `+ Z9 g6 R7 Q
5 S$ F1 _% I3 S) c9 s. U& G
Protobuf-C 是 Protocol Buffers 的 C 语言实现,它专门针对 C 语言环境进行了优化,提供了类似于官方实现的功能,同时支持与其他语言生成的 Protobuf 数据进行交互。Protobuf-C 生成的库文件可以被 C 语言项目使用,使得在 C 语言环境中进行高效的数据序列化和反序列化成为可能。9 T. I# ?3 N/ X0 b( Q
/ i4 \2 ]; ~: S \/ b+ h
Protobuf优点包括:
9 q2 s* t- e1 X- o! N1 X9 `, e, J高效性:protobuf 生成的数据格式通常比 XML 和 JSON 更加紧凑,序列化和反序列化速度更快。可扩展性:支持向已有消息类型添加新的字段或消息,而不破坏向后兼容性。语言无关性:protobuf 支持多种编程语言,包括 C++, Java, Python, Go, 和 C# 等。自动代码生成:通过 .proto 文件定义消息格式后,可以使用编译器自动生成目标语言的代码,简化开发工作。
3 O( R( }# O+ U5 W- ?' A6 z* ^+ i/ `1 R1 I# \
Protobuf代码仓库:https://github.com/protocolbuffers/protobuf7 E+ A" B" t' B8 E' O. ~
' L0 p2 q) T4 v5 t# _: X5 `5 sProtobuf-C代码仓库:https://github.com/protobuf-c/protobuf-c
, S7 N8 e! G4 m2 i3 _- T' l6 R' ^# h4 y; g! l
由于我需要在SoC开发板上使用C语言版的Protobuf库,所以需要使用到Protobuf
& B( _3 E, \) q# e& U% F. i& r和Protobuf-C。5 i- a; K- m" z; ]
, I5 C; i% b5 [* m( T M
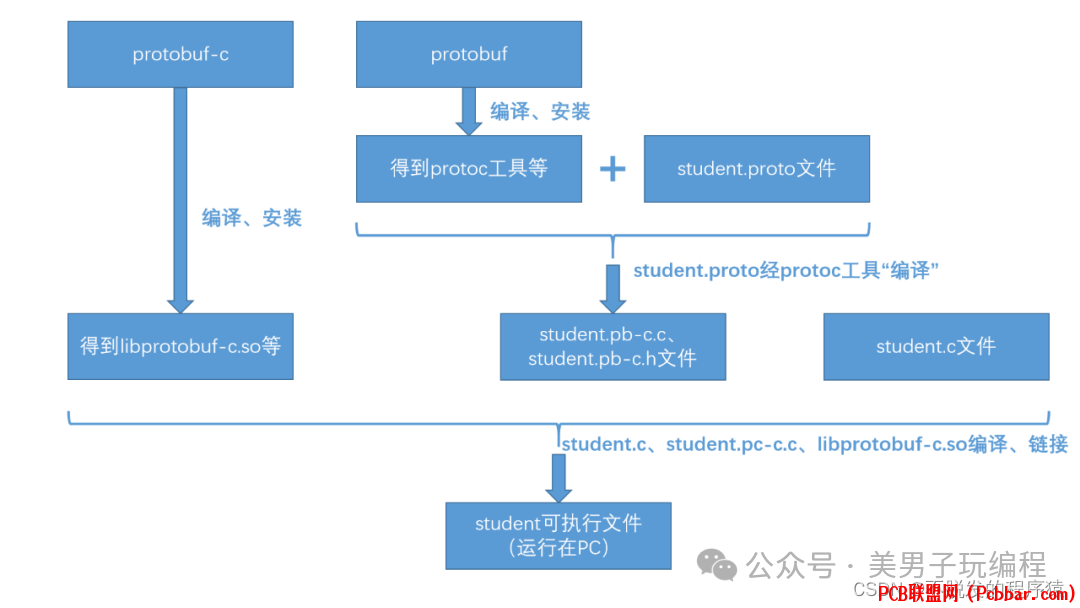
Protobuf 提供了 Protobuf 工具,用于将 .proto 文件转换为 C 源代码和头文件,而 Protobuf-c 生成了编译所需的动态库。
; S5 u( s, T& V4 C$ S! @
) R; c& I' T. ?0 B7 J/ f" y
rfifmu4bvre6403401214.png
 / v- L# t. n' n- C/ C( r- Z
/ w! J( Y+ l2 q* Y. f7 n9 W
3 R5 u3 O; E, k& a, R1
; u$ B& O& | F5 G: m: L开发环境和工具. d; o6 A2 Q0 q, f
8 R: w4 e! w# L0 [硬件环境2 W* Q# }, |- ]) N1 \- r5 ~( ~
台湾联咏NT96570BG
3 ]# G* F& [' d' q
0 x+ U1 _9 G+ i' r% p+ S U; q- g3 I& U4 H, k3 I
软件环境
( {, a, I) D: b* O! e8 }Ubuntu 18.04.69 \5 `, E$ ~- W3 e, V
0 T" E% l4 b6 _- a( }# z
# s% R" Q! F) f% P* L" s: _; y
SDK
0 z" u% H% [% O* `" q7 b* a( a& f Ana51055_linux_sdk-release.tar.gz6 R: N2 ?3 i! X- W7 r
7 L2 ?$ J- V# J# O9 _8 F/ J4 ^+ l& W( X( `
交叉编译工具链! x% \2 @, `$ K" k' D, {; i
nvt-96570-toolchain.tar.gz
- s8 ^0 d9 r+ u
R# W. v0 U' g* C& F) Z6 S
' U/ q% i& e$ B4 s( s. p2 `7 AProtobuf版本$ \6 h- X- H1 L7 G' M' \
V3.6.1(SoC需要和上位机通信,保持双方版本一致)
7 v+ r- ~( P& G5 z- O% V$ E$ w* T n) F
2
" w* y+ _/ E9 o$ n& h4 n: @5 Q安装和编译Protobuf、Protobuf-C库
' M( G4 X/ O3 W& l0 U9 r
0 J+ r0 X9 Y" t* H1 B8 pSoC编译和使用Protobuf库有2种方式:( V( z) ]+ S% }+ M
下载Protobuf、Protobuf-C源码,集成到SoC SDK包中,修改makefile文件和相关配置,每次编译SDK固件时,也会编译和生成Protobuf所需的库和文件。在Ubuntu系统下载和编译Protobuf、Protobuf-C源码,将编译好的库和文件拷贝到SoC APP应用工程中,修改makefile文件和相关配置,直接使用。
' G! n H. ~/ K; F. y* C2 h+ b. F& N3 p- U2 x( e3 ?
这里我们使用第二种方式。
$ ?2 y& v1 a! F
% c$ u5 ]8 w- f" n, o4 O# u1、安装依赖项
' Z9 o. ?/ v* L4 e& usudo apt-get install autoconf automake libtool curl make g++ unzip pkg-config
! {% t) B- J. `8 N6 t2、安装Protobuf& T- u8 b# E/ J5 Y. n
下载Protobuf V3.6.1,解压后进入文件夹,指令如下:
: g$ ?% ?8 u. Z; Ycd protobuf./autogen.sh./configuremakesudo make installsudo ldconfig/ K5 O* Q" p3 N7 B' }4 C4 M+ |
含义如下:) s9 s- v3 x6 H: D& N
cd protobuf: 进入名为 protobuf 的目录。./autogen.sh: 运行 autogen.sh 脚本,用于生成 configure 配置脚本。./configure: 根据生成的配置脚本,配置编译环境。make: 编译源代码。sudo make install: 安装编译生成的文件到系统中。sudo ldconfig: 更新动态链接库缓存,使得系统能够找到新安装的库文件。) T% U2 T! C. P- K0 d6 b
4 Z1 i; r. D, T% \如果不需要使用指定版本的Protobuf,可以使用git指令下载库:
( F3 j9 y. R8 i& i" Bgit clone https://github.com/protocolbuffers/protobuf.git6 m6 y& `" U& z0 y" ?
3、安装protobuf-c
9 `" A6 t$ j& G" Q* Oprotobuf-c不需要指定版本,直接使用git指令下载仓库,指令如下:8 T H! M) x; V7 L: h! E* f; s
git clone https://github.com/protobuf-c/protobuf-c.gitcd protobuf-c./autogen.sh./configure --host=arm-linux-gnueabihf CC=/opt/arm/arm-ca9-linux-gnueabihf-6.5/usr/bin/arm-ca9-linux-gnueabihf-gcc CXX=/opt/arm/arm-ca9-linux-gnueabihf-6.5/usr/bin/arm-ca9-linux-gnueabihf-g++ --disable-protoc --prefix=$PWD/tmp_outmakesudo make install
, b. d0 \9 o; r$ h& v含义如下:) w, U1 X1 [: g3 g; H
cd protobuf-c: 进入名为 protobuf-c 的目录。./autogen.sh: 运行 autogen.sh 脚本,用于生成 configure 配置脚本。./configure --host=arm-linux-gnueabihf CC=/opt/arm/arm-ca9-linux-gnueabihf-6.5/usr/bin/arm-ca9-linux-gnueabihf-gcc CXX=/opt/arm/arm-ca9-linux-gnueabihf-6.5/usr/bin/arm-ca9-linux-gnueabihf-g++ --disable-protoc --prefix=$PWD/tmp_out: 配置编译环境,指定目标架构为 arm-linux-gnueabihf,并使用指定的交叉编译器进行编译。make: 编译源代码。sudo make install: 安装编译生成的文件到系统中。% q- q" Y; d- @: @$ z0 n1 o1 w* A
( R1 H0 \! ^' I! T1 x# r
重点说一下configure配置编译环境指令:
4 @8 w' a, n9 ^% }8 g7 T: {7 Z./configure: 运行配置脚本。--host=arm-linux-gnueabihf: 指定目标系统架构为 arm-linux-gnueabihf,表示编译生成的程序将在 ARM 架构上运行。CC=/opt/arm/arm-ca9-linux-gnueabihf-6.5/usr/bin/arm-ca9-linux-gnueabihf-gcc: 指定 C 编译器为 /opt/arm/arm-ca9-linux-gnueabihf-6.5/usr/bin/arm-ca9-linux-gnueabihf-gcc,即指定了交叉编译器。CXX=/opt/arm/arm-ca9-linux-gnueabihf-6.5/usr/bin/arm-ca9-linux-gnueabihf-g++: 指定 C++ 编译器为 /opt/arm/arm-ca9-linux-gnueabihf-6.5/usr/bin/arm-ca9-linux-gnueabihf-g++,即指定了交叉编译器。--disable-protoc: 禁用 protoc 工具的构建,这表示只编译动态库,而不会生成 .proto 文件对应的 C 源码和头文件。--prefix=$PWD/tmp_out: 指定安装路径为当前目录下的 tmp_out 目录。
! ]. `# J6 O9 v, S5 G
) [2 H5 F/ b" [* l E+ d7 ^如果不是ARM SoC使用,只是Ubuntu系统使用,配置编译环境就无需指定交叉编译工具链,指令如下:6 c; H7 X8 X6 g( L% Q
./configure
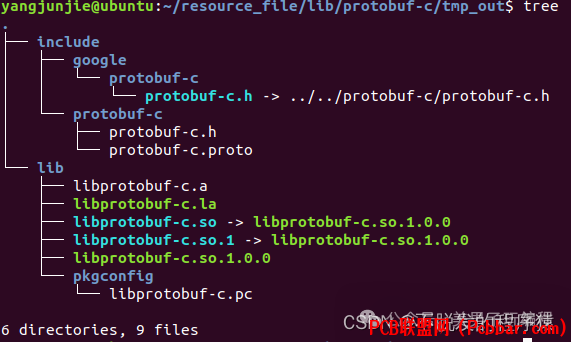
2 U; _/ D5 x) J+ W. |9 ]" p# ^1 ~: _ tProtobuf、Protobuf-C默认安装在/usr/local路径下:
: }% F n$ ~, Q0 N' a
yorzmlos1io6403401314.png

+ L0 ~' m0 T% c Q9 a8 A+ }/ ~ ~7 v. W H
使用指令可以查看Protobuf、Protobuf-C的版本,指令如下:
$ R+ r6 \! W( m( P! X$ M* Y4 cprotoc-c --version; C' a; t7 S' U" y$ Y! z! K
: [* v1 { U* a( T3 _( `
u5iiqx5iknr6403401414.png
 # Q1 B4 b8 f1 i4 p x
/ F# }2 ?8 f) H! ]6 r: S( Z编译Protobuf-c代码时,指定了链接库输出在当前目录下的 tmp_out 目录。将编译输出物都拷贝到SoC APP应用工程中。
) z5 c% R' w9 }) Q, T2 z
+ h2 b" p8 P8 n9 }! i; l
3fsezeyyxrs6403401514.png
 9 D* R8 l8 m) t& T
' B( P. h/ r9 F( Z8 g7 C
3 j& o2 {" n6 w2 S3 r5 Q
编写和编译proto文件6 |/ G* T1 P0 C- Q
1、创建一个proto文件,文件命名为:LM_PCD_LD.proto,定义了一个消息类型:
; q7 @; V! k+ q; c- E. u; ?syntax = "proto3";
2 T- v$ W5 h+ B4 H! s4 ]. V, Kmessage Person { string name = 1; int32 id = 2; string email = 3;}2 o% Q+ L+ P6 g$ h+ w+ y7 P9 H: O4 M
2、使用 Protobuf 编译器(protoc)生成对应的C代码:3 i0 [/ x+ y- m
protoc --c_out=. LM_PCD_LD.proto.proto
& N$ \$ L% V8 k& \6 e C编译生成:LM_PCD_LD.pb-c.c和LM_PCD_LD.pb-h文件。将文件拷贝到SoC APP应用工程中。
1 o; \& u/ ~' u
% S3 ?8 d- x& }. c0 W( V# C
ngxbzacbjjh6403401614.png
 6 x5 B+ `% e( B0 _1 K# C) K8 s( Z0 `
) s' R3 o. ~/ ^, q
) @. M. [3 t8 [/ z7 O6 |8 Y4& c8 A5 Z1 ?! H2 Z$ J' u; }& g3 t0 H
修改makefile文件
- }# y8 W" S4 H8 E' b1、添加头文件路径: Z/ g- u2 U" s- z' m$ c1 K4 Z
chcfxafzlnh6403401714.png

4 a. \' T) X/ l* H5 O) ?2 u* J' l8 ~9 K6 \9 q0 d* N, h
2、添加动态链接库路径:
$ A: M* H( Q/ w; {9 e, |( l
ogmy2wn440e6403401814.png

$ ~; Z K7 m6 O/ M( l5 g6 }2 Z! i. P5 @6 Z8 u. M# `' w, q& e
3、添加代码路径:
1 A: J8 C* N) t/ k
nmabqbzfa0i6403401915.png

) s7 R' p: Y+ ~" {- u* [( y
, @6 M& m& j3 ~& F) T' }4、拷贝动态库到系统库文件下:0 d8 m3 ]- B" P9 ~/ w
sfgno2m0yt36403402015.png

_ q7 P3 A" x9 r
m0 L" r8 {5 k3 } c% _/ D" J( R4 R5 R0 a# O7 G0 N
5( q( v- e" Q1 f: o3 e: x
测试示例 y' `! X) p5 Q* x
#include #include "LM_PCD_LD.pb-c.h"
- w/ j7 `3 u; Y5 v( c& t0 yint main() { // 创建并初始化 Person 消息对象 Person person = PERSON__INIT; person.name = "John Doe"; person.id = 1234; person.email = "johndoe@example.com";0 n C. `) D, `6 w$ }# |, E" N- R
// 序列化消息对象 size_t packed_size = person__get_packed_size(&person); uint8_t buffer[packed_size]; person__pack(&person, buffer);
* y# I, V# v/ J: O# U% ^ // 反序列化消息对象 Person *unpacked_person = person__unpack(NULL, packed_size, buffer);7 f6 D- n! j P+ u3 s6 ]
// 打印反序列化后的消息内容 printf("Name: %s) h8 g; A3 W4 B$ }
", unpacked_person->name); printf("ID: %d' ?- }, `. A3 I* N1 w! B7 c, T
", unpacked_person->id); printf("Email: %s- W) z0 I5 [' t; M+ h& h5 N4 i' e
", unpacked_person->email);2 n" ]' t- ^, L5 c7 T8 ~8 q( ^* C( z
// 释放内存 person__free_unpacked(unpacked_person, NULL);
" _; q6 I+ q" E return 0;}) D7 N- b- `3 t- @0 a
& h( t ?6 @: g' M9 i
ldlydk4ybgq6403402115.jpg
 1 o& Z& i" k9 E8 g) q* H
53c1ndgwzf36403402215.gif

0 ] y2 J) t; |/ J4 {点击阅读原文,更精彩~ |
|